February 21, 2023
by Graeme Rawson
The new GForce Preset Browser, first seen in Oddity3, will eventually be coming to all GForce instruments. As well as providing a great experience for users, we also designed the browser with professional and amateur Sound Designers in mind. This article outlines some of the features you can use to create, organise, and share your presets, as well as a few tips to make your presets look and sound the best they can.
Following these guidelines will help provide users with a great experience of both your presets and our synths.

Collections
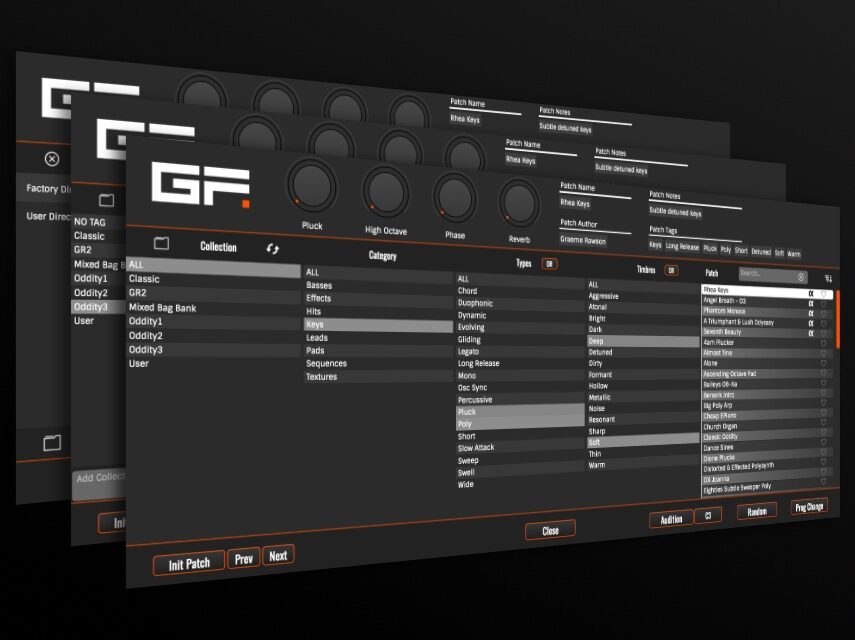
Collections are the top level of preset organisation. Sound designers will often create themed sound banks, for sound types, music genres, or uses. Collections are designed to be easily sharable with others via the export feature (more on that later).
You can make your own collections when you save a new preset. At the bottom of the collection menu on the save screen, type the name of your new collection and press the + button. After saving the preset, that option will show up in the list for all other preset saves.

The name of your collection is important because it will be the main way people recognise your presets. Do not use any of the factory collection names or the word “user”. Do not use it for tagging types of presets either, since we have a tagging system for that. So don’t use words like “bass” or “pads” unless they are part of a theme name.
Example collection names:
- Epic Soundscapes
- SoundCity’s EDM Pack
- Funky ‘74
You can rename an entire collection from the browser screen: right-click > rename.
Tagging
Tagging is the key to finding presets in your library by choosing tags in the filter columns to narrow down the list of presets on the right side. It’s important to tag your presets correctly so they’re easy to find and helpful for the user.
Like collections, you can add your own tags. There are three different kinds of tag:
Category – Only one per patch. Describes the preset’s overall function. Pads, Basses, Leads, Keys. We’ve provided what we think is a comprehensive list to use already.
Type – These are more functional descriptions, whether a preset is mono or poly, percussive or legato etc
Timbre – These are more subjective sonic descriptions. If a preset is bright or dark, fat or thin, etc.
Don’t over tag. If you’re unsure, it’s better to use fewer, more general tags than lots of niche descriptions. The combination of just 3 to 6 tags will bring your preset up in the right places.
Metadata
Metadata appears at the top of the browser when a user selects a patch. When you save a preset you can put your name, or artist name, in the Author box. This saves you from having to put it the collection name. Previously used author names can be quickly selected from the drop-down menu.
We’ve also included a notes area that you can use to describe the patch, recommend uses, or tricks and tips about it.
The final 4 metadata boxes are where you can name your Macros (if available). This macro name appears in the browser under each macro knob.
GForce Factory Standards
We highly recommend levelling your presets to match the factory content. Presets designed by GForce sound designers are all levelled at approximately -6dB when played at full, or high velocity. For poly patches we measure this with 4 notes playing. By matching this level your presets won’t sound quiet compared to others, nor will they unduly blast the user with unwanted level as they browse.
Generally we try to use Macro 1 (where available) for a significant creative effect or tonal change, and Macro 4 is often an FX-based adjustment. These aren’t hard and fast rules, but it helps a user navigate your sounds.
Exporting

As I mentioned earlier, collections can be exported with right-click > export. This will create a single file with all the presets, tags, and metadata in that collection. You can then share that file or make it available to download from your site.
Before exporting, please take a moment to finalise the collection, checking levels and metadata, and be sure to remove the Favourite status on any presets in that collection, else it will transfer to the user.
Importing
A user can import the collection file from the button in Collection Management Screen. Imported collections will appear as a new collection in the left of the user’s browser.